Poses
Use this hip stretch before sitting for long periods of time. It’s also the perfect stretch before sitting for meditation. Learn how to do Pigeon Pose now.

Updated on: 27th June 2025
Posted on: 27th June 2025
Pigeon pose is a hip opener that safely opens your hip joints. It also helps prepare your body to sit in meditation more easily. Pigeon pose strengthens the back, eases back pain, and is said to open up the heart chakra.
In Sanskrit, Pigeon Pose is called Kapotasana (caap-oh-TAA-saa-nah). Kapota means dove or pigeon, and asana means posture or yoga pose.

Opens tight hips by stretching the thighs, groin, back, piriformis, and psoas muscle
Increases external rotation of the femur in the hip socket and lengthens hip flexors, creating more flexibility in the hips
Stretches the muscles, tendons, and ligaments around the knees and increases circulation in these areas
Improves posture and respiration
Alleviates back pain
Draws the focus inward, calming the mind
Opens up the cervical region and the shoulder joints
Removes accumulated stress from the neck region
Stimulates the thymus gland, improving immune function
Helps relieve sciatica, colitis, and piles
Improves blood circulation to the muscles of the pelvic floor
Helps get rid of excess visceral fat
Prepares you for seated postures and backbends

Precautions
This pose is contraindicated for people with knee injuries, recent knee surgeries, spinal, abdominal, or sacral injuries, sacroiliac issues, hip injuries, and those who have undergone recent hip replacement surgery. People with delicate or inflexible wrists should also be careful.
Common mistakes
Rotated rear leg: Your rear leg should be in a neutral position rather than rotated outward. To correct this, tuck your toes under and lift your thigh to adjust your hips so they are square.
Hips not square: Make sure your hips are properly aligned. Don’t collapse toward either side. Keep your hips square using props and padding as needed.

There are four variations of the Pigeon Pose:
One-Legged Pigeon Pose
Pigeon Pose
Resting Pigeon Pose
King Pigeon Pose
Here are step-by-step instructions to explore the first three variations:
One-Legged Pigeon Pose
Start with a Cat and Cow Pose to loosen up, then come into a tabletop position on your hands and knees with your hands shoulder-width apart and your knees hip-width apart.
Move the right knee forward on the mat behind the right hand, placing the outer edge of the right shinbone and right buttock on the mat.
Keep the right knee bent and pointing forward.
Stretch the left leg out behind you with the top of the left knee, left thigh, and left ankle resting on the floor. Your left foot should face the ceiling.
With your right heel near the left hip bone, gently lower your pelvis down.
Breathing in, press the palms onto the floor, extend your spine, open the shoulders and chest, and lift the sternum up.
To advance into Resting Pigeon Pose, take a deep breath, and as you exhale, fold forward, bringing your torso over your right leg. Stretch your arms straight in front of you with your elbows slightly bent. Place your forehead on the mat in front of you, and rest with gentle breaths in and out.
To advance into a One-Legged King Pigeon, slowly bring the torso upright, then as you exhale, gently bend the left knee and grab hold of the left big toe with the left hand. Keep the hips square.
Breathing in, open up your chest. Roll the left shoulder externally so that the left elbow points toward the ceiling.
Pull the left foot close to the back of your head.
Hold the pose, and keep breathing.
Inhale, release the left foot and exhale as you straighten the left leg.
Return to the tabletop position, and repeat with the left leg in front.
To increase the challenge:
Mermaid Pose
After step 6, bend your left knee and reach back for your left foot with your left hand. Hook the elbow of your left arm around the top of your left foot. Once you have the hook, reach your right arm up and back to clasp the left fingertips or wrist.
Pigeon Pose

Stand at the front of your mat with feet hip-width apart and arms alongside the body.
Exhale, and come into a Standing Forward Bend.
Inhale, and go into a Forward Lunge with the right leg forward and the left leg back.
Exhale, and place the outside of your right shin on the mat in front of you, with your right heel near your left hip.
Place the left knee down on the yoga mat with the left foot facing the ceiling.
Place the palms down in line with the right foot.
Inhale, press your palms into the floor, straighten your arms, and simultaneously elongate your spine. Open your shoulders and chest, lift your sternum, and look up.
Hold the position for 30 to 60 seconds and breathe deeply.
If you are comfortable, you can proceed to Resting Pigeon Pose or King Pigeon Pose or return to Forward Lunge, then repeat with the left leg in front.
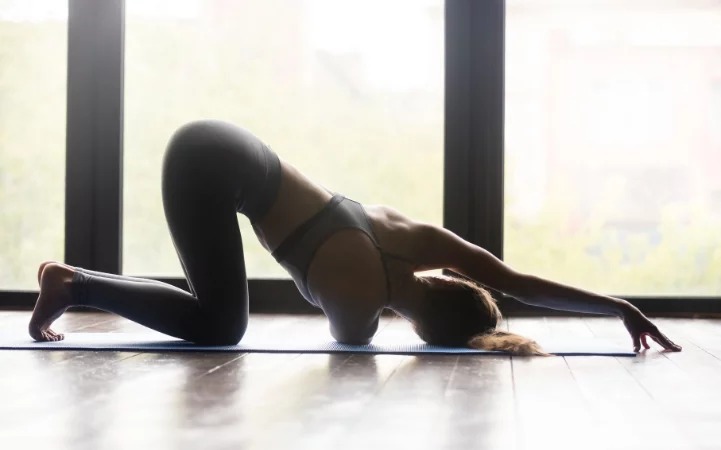
Resting Pigeon Pose
Start in a Downward-Facing Dog Pose on a yoga mat.
Raise your right leg and bring your knee to the back of your right wrist.
Keep your left leg straight and reach it toward the mat.
Bring your right knee outward, past your hips, and flex your right foot toward your shin.
Place your hands under your shoulders and press into your palms to lengthen your spine.
Bring your forehead to the mat, or rest it on your hands, a block, towel, or blanket.
Square your hips.
Make sure you keep breathing, allowing your breath to help ease you into the pose.
To release the pose, slowly lift your forehead and bring your hands toward your hips.
Curl your left toes under and step back into the Downward-Facing Dog Pose.
Repeat on the other side.
To make it easier
If the hip of the leg bent in front of you doesn’t touch the floor, use adequate padding under the buttocks on that side. You can use several blankets or a block. It’s important to evenly distribute your weight on both hips by keeping your hips square. Otherwise, you are likely to put stress on the knee and twist your sacrum.
If Resting Pigeon Pose is difficult, use a block under your forearms and/or under your forehead. This creates a support system of props so that you can relax into the forward bend.
If Pigeon Pose just doesn’t work for you, Thread and Needle Pose is a good substitute.
When practiced regularly, breathing and meditation supercharge yoga’s life benefits. To get the most out of your yoga practice, add Sudarshan Kriya Yoga, also known as SKY Breath Meditation.
SKY practitioners report:
Greater mental focus
Healthier blood pressure
Enhanced deep sleep
Mental fortitude
Increased joy and optimism
Decreased stress, anxiety, and depression