
Butterfly Pose: One of the Best Remedies for Too Much Sitting

Butterfly Pose: One of the Best Remedies for Too Much Sitting

Poses

Is too much sitting leaving your hips tight and uncomfortable? Learn how to do a butterfly pose and get significant relief with this simple remedy.

By Art of Living Editorial Team

At the Art of Living editorial desk, our team of writers, editors, and wellness practitioners come together to share insights rooted in ancient wisdom and modern living. From yoga and meditation to breathwork, mindfulness, and personal transformation, we’re dedicated to bringing you stories and guidance that inspire a more conscious, joyful life.

Updated on: 23rd June 2025

Posted on: 23rd June 2025

1. Butterfly pose

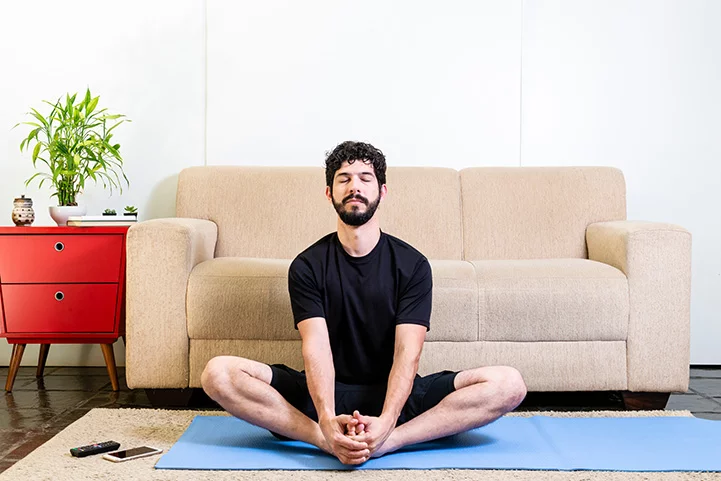
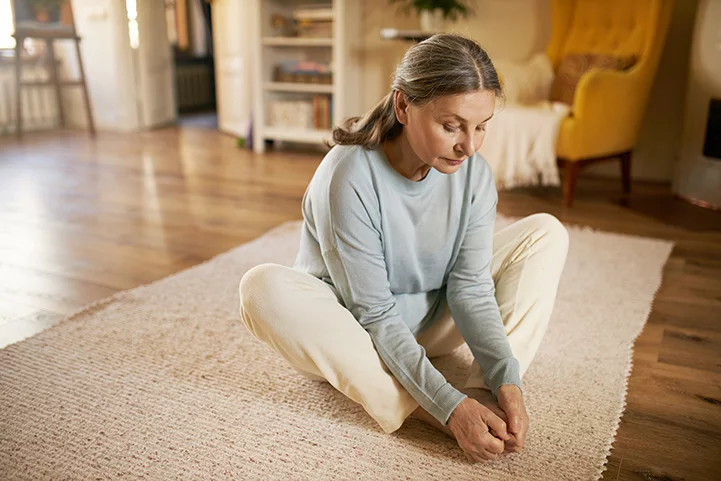
Butterfly pose is aptly named because of the way it is practiced. Sitting on the floor or yoga mat, both feet are tucked close to the groin and clasped with the hands. The legs appear like butterfly wings, especially when moved up and down. Butterfly pose can be used as a stand-alone pose for relieving tight hips, or as part of a daily yoga routine.

Butterfly pose is also known as bound angle pose, cobbler pose, and Baddha konasana in Sanskrit.

2. Benefits of butterfly pose

  • Stretches the inner thighs, groin, and knees
  • Improves flexibility in the groin and hip region
  • Increases blood circulation in the lower abdomen
  • Encourages healthy bowel movements
  • Removes fatigue from long hours of standing and walking
  • Increases external rotation in the hips, as it creates space around the pelvis
  • Offers relief from menstrual discomfort and menopause symptoms
  • Helps in smooth delivery if practiced regularly until late pregnancy
  • Calms and relaxes an anxious mind

3. Step-by-step instructions for butterfly pose

  • Start in a seated position with your spine erect and legs spread straight out
  • Bend your knees, and bring your feet towards your pelvis 
  • The soles of your feet should touch each other
  • Grab your feet tightly with your hands (you may place your hands underneath your feet for support)
  • Make an effort to bring your heels as close to your groin as possible without straining
  • Take a deep breath in 
  • Breathing out, fold forward and press your thighs and knees down toward the floor 
  • Make a gentle effort to keep pressing your thighs downward
  • Start flapping both of your legs up and down like the wings of a butterfly
  • Start slow, and gradually increase the speed, continue to breathe normally
  • Slow down and then stop 
  • Take a deep breath in, and as you exhale, bend forward, keeping your chin up with a straight spine
  • Press your elbows on your thighs or your knees, pushing your knees and thighs closer to the floor
  • Feel the stretch in your inner thighs, and take long, deep breaths, relaxing the muscles more and more
  • Take a deep breath in and bring the torso up
  • As you exhale, gently release the posture
  • Straighten the legs out in front of you and relax

4. Precautions for butterfly pose

If you are suffering from a groin or knee injury, it is best avoided. If the injury is mild, you could try keeping a blanket under your outer thighs for support. Take the advice of either your healthcare provider or an experienced yoga instructor.

Also, sciatica patients should either completely avoid this pose, or sit on a cushion or folded blanket to raise the hips.

If you have any lower back disorders, do the posture only while keeping the spine straight. Avoid rounding the spine by bending forward. Be sure to keep breathing!

Note: While a regular yoga practice can result in improved health, it is not a substitute for medical treatment. It is best to learn and practice yoga under the supervision of a trained teacher.

5. Modifications for butterfly pose

Like all poses, butterfly pose can be adjusted to accommodate your body’s individual needs.

Beginner’s butterfly pose: Start with the heels further from the groin gradually bringing the feet closer to the groin over time.

Forward bending butterfly pose: For more of a stretch, tuck the heels close to the groin. Breathing out as you bend forward, stretch your arms out and place them on the floor or mat in front of you. Keep your back straight and keep breathing!

Browse our entire yoga pose library, and learn more about each yoga pose in detail.

6. Breathing for a better yoga experience

Yoga and breath go together like smiles and sunny days! To learn more about how the breath can enhance your yoga practice (and so much more!) we invite you to attend a FREE online introductory breath and meditation session. The certified instructor will teach you a breathing exercise, and lead you through a guided meditation, while introducing you to SKY Breath Meditation. Click on the image below to save your spot!

In this Article

Discover more from Art of Living

Liforme Yoga Mats
SKY Breath Meditation
Learn More →
Product Innovations
Art Of Living Courses
Learn More →
Yoga Events & Retreats
Foundation Program Online
Learn More →