Here’s everything you need to know when starting to learn yoga. How-to’s, benefits, and tips will help you make the most of your yoga practice.


The beauty of yoga is that yoga is for everyone. And “every” body has a yoga body! Whether you are young or old, flexible or tight, fit or unfit, a regular practice of yoga strengthens the body and calms the mind.
Contrary to popular belief, physical flexibility is neither the prerequisite nor the ultimate goal to practice yoga. Striking a perfect pose is also not the goal. What matters at the end of a practice is the state of your mind and body. If you feel at peace and in the present moment, then you are practicing yoga.
Let’s dive in to learn more!
Topics covered:
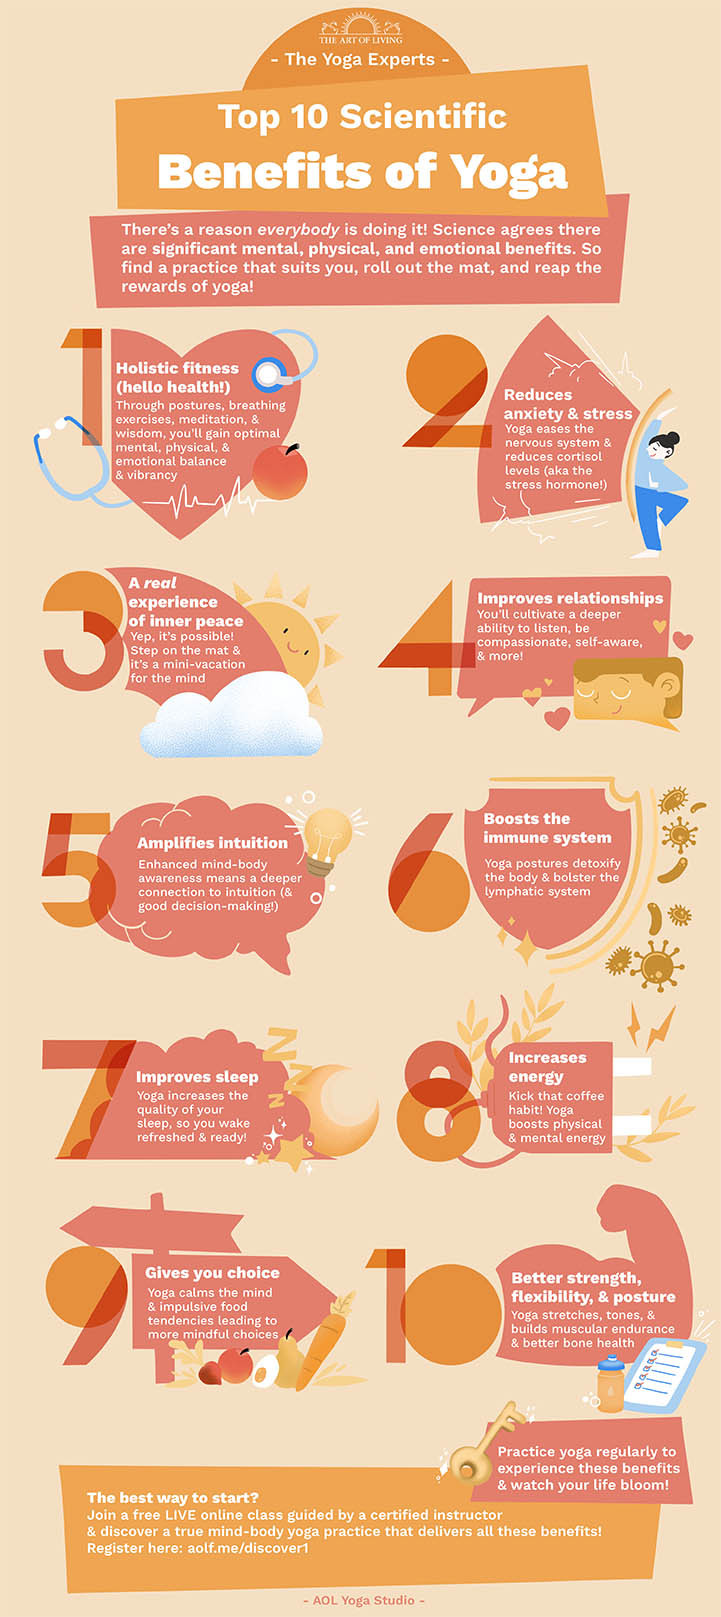
- Scientific Benefits of Yoga Infographic
- Basic Yoga Poses
- Intermediate Yoga Poses
- Advanced Yoga Poses
- Yoga poses for beginners: Benefits and tips
- How to practice yoga safely as a beginner
- Common mistakes to avoid when practicing yoga
- Yoga equipment for beginners: What you need
- Yoga poses for kids: Benefits and tips
- Supplement your yoga practice with the Art of Living
- Related articles

Basic Yoga Poses (Asanas)
An important thing to remember when starting a yoga practice is that there is no rush to learn everything or to master a posture. Yoga is about you and being in that space, stretching your body and your consciousness. Here are some great yoga poses for beginners.

Stand at the top of your mat with your big toes touching and a sliver of space in between your heels.
Starting from the base of the pose, flex your toes, bringing your weight into the four corners of your feet. Make sure your weight is distributed equally.
Activate your thigh muscles and lift your kneecaps. Tuck your pelvis.
On an inhale, roll your shoulders up to your ears, and on an exhale, roll your shoulders down your back. This straightens your spine and improves posture.
Hang your arms beside your torso with your hands gently engaged, fingers toward the floor.
Imagine that a string is pulling the crown of your head towards the ceiling.
Elongate your neck. Bring your chin parallel to the floor and gaze gently in front of you.
Breathe evenly for the duration of the posture.

Stand up straight with your feet together or hip-width apart and parallel to each other on the yoga mat.
Reach your arms straight out in front of you with your palms face down, or you can bring your hands together over your head with your arms straight.
Bend your knees deeply, and sink your pelvis toward the ground as though you are sitting down in an imaginary chair.
Make sure that your knees are in line with your ankles and toes, with the weight of your body on your heels.
Do your best to remain as comfortable as possible while maintaining the posture. A burning sensation in your quadriceps is normal.
Inhale deeply to lengthen the spine, and sink your tailbone further down on every exhale.
Hold the posture for 30 to 60 seconds.
To come out of the posture, stand up straight, or sit all the way down on the mat.

Start on your hands and knees in tabletop position with proper alignment. Place your hands shoulder-width apart and your knees directly underneath your hips.
On an exhalation, lift your hips upward to come into an inverted V-shape position, with each leg as straight as you can comfortably make it.
Press your hands firmly into the mat, draw the shoulder blades inward, and make sure the feet are hip distance apart and parallel. Take a deep breath.
Relax your head and gaze toward the navel. With straight legs, each heel should come as close as possible to being flat on the yoga mat.
If the spine is rounded at all, bend your knees to bring it into the correct alignment: it is important that the spine lengthens first.
Hold the posture while taking deep, full breaths.
On an exhalation, release each foot and each knee and come out of the down dog. Return to a resting pose like tabletop position or child's pose on the yoga mat.

Stand up straight in mountain pose with your feet hip-distance apart and your arms by the sides of your body. Breathe deeply and evenly, bringing your mind to the present moment.
Separate your legs wide apart at a distance of at least three to four feet.
Turn your right foot out at 90 degrees and your left foot in at 15 degrees, or keep it straight with your toes pointing forward.
Align the heel of your right foot with the center of your left foot.
Turn your upper body to the right.
Breathe in and reach your arms up, keeping your hands shoulder-distance apart and your palms facing each other. Keep your gaze forward. You may bring your palms together and look up at your thumbs.
Exhale, and with your arms raised, bend your right knee and bring your right thigh parallel to the floor, feeling the stretch in your thigh and hip.
Keep your right knee above your right ankle. Make sure that the knee does not extend beyond the ankle. Keep the back foot grounded and the back leg straight without bending at the left knee.
Stay in the pose for about five to ten breaths.
Breathing in, straighten your right knee. Breathing out, bring your arms down.
Repeat the pose on the other side.

Start by standing in mountain pose facing the long edge of your yoga mat. Separate your feet 3-4 feet apart.
Turn your right foot out 90 degrees and your left foot in 15 degrees, or you can have your left foot facing forward.
Align the center of your right heel with the center of the arch of your left foot.
Keep your weight equally balanced between both feet.
Breathing in, extend your arms parallel to the floor at shoulder height.
Breathing out, extend your upper body on the right side. Breathe in and as you exhale, fold at your right hip, bending your body to the right and lowering it down. Let your head, chest, and pelvis face forward. Raise your left arm straight up into the air, and extend your right arm down towards the floor. Keep the left shoulder stacked above the right shoulder.
Comfortably rest your right hand on the shin, ankle, or knee of your right leg, or on the yoga mat. Stretch your left arm toward the ceiling in line with the tops of your shoulders. Keep your head in a neutral position, or turn it to the left, with eyes gazing softly at the left palm.
Make sure that your body is bent sideways and not backward or forward. Tilt the pelvis backward if necessary to keep it from drifting forward on your extended side. Open your upper body to the sky.
Focus your gaze, and stay in triangle pose for 5-10 breaths.
As you inhale, come up, bringing your arms down to your sides.
Repeat the triangle pose on the opposite side, extending your right arm up and your left hand down.

Stand tall in the mountain pose with your arms relaxed by your sides.
Bend your right knee and place your right foot high up on your left thigh. The sole of your right foot should be placed firmly against your left inner thigh (not your knee).
Make sure that your standing leg (left leg) is straight. Find your balance.
Once you feel steady, take a deep breath in and bring your palms together in Namaste (prayer pose) at your chest.
Look straight in front of you and gently focus your gaze on an unmoving object.
Ensure that your spine is straight, and continue breathing deeply. Hold the pose for five to ten breaths.
On a slow exhalation, gently bring your hands down to your sides.
Gently bring your right foot to the ground and return to mountain pose.
Repeat on the other side.

To begin, lie on your back.
Bend your knees so that your feet are flat on the floor in a parallel position in line with your sitting bones, about a foot’s distance away from your hips.
Place your arms by your sides with your palms facing down.
As you inhale, begin to roll your spine upward as you lift your hips toward the sky. Support the weight of your body through your feet, ankles, and thighs rooting down into the ground.
Squeeze your buttocks to keep a lift through your hips and keep your legs in a parallel position without collapsing or splaying outward.
Maintain an easy breath as you strengthen your body in this pose.
Hold the posture for 1-2 minutes and then release on an exhalation.

Start in a seated position with your spine erect and legs spread straight out.
Bend your knees, and bring your feet towards your pelvis.
The soles of your feet should touch each other.
Grab your feet tightly with your hands (you may place your hands underneath your feet for support).
Make an effort to bring your heels as close to your groin as possible without straining.
Take a deep breath in and while breathing out, fold forward and press your thighs and knees down toward the floor.
Make a gentle effort to keep pressing your thighs downward.
Start flapping both of your legs up and down like the wings of a butterfly.
Start slow, and gradually increase the speed, continue to breathe normally.
Slow down and take a deep breath in, and as you exhale, bend forward, keeping your chin up with a straight spine.
Press your elbows on your thighs or your knees, pushing your knees and thighs closer to the floor.
Feel the stretch in your inner thighs, and take long, deep breaths, relaxing the muscles more and more.
Take a deep breath in and bring the torso up.
As you exhale, gently release the posture.
Straighten the legs out in front of you and relax.

Sit cross-legged or in lotus or half-lotus.
Bring the hands behind your back.
Place the right hand in the Adi mudra position, where the thumb turns across the center of the palm, the tip of the thumb rests at the base of the pinky finger, and all four fingers bend to form a fist that covers the thumb.
With the left hand, loosely grasp the right wrist.
Allow both hands to rest on the lower back.
Bend forward as far as you can, resting your forehead comfortably on the floor, a pillow, or a block if possible.
Feel the stretch in the lower back muscles.
Breathe in and slowly bring your body out of the posture, one vertebra at a time, head and neck coming up last. Release the hands once your spine is erect again.

Sit on your heels and bend forward and lower your forehead to the floor.
Keep your arms alongside your body with your hands on the floor, palms facing up. (If this is not comfortable, you can place one fist on top of the other and rest your forehead on them).
Keep breathing.
Slowly raise your abdomen, uncurling your spine vertebrae by vertebrae, and come up to sit on your heels.
Adamantine Pose (Vajrasana or diamond pose)

From a sitting position on your yoga mat, fold your right leg and your left leg underneath you.
Gently sit your hips down onto your heels, with your toes pointing behind you, and your big toes touching.
Sit with your spine erect and your buttocks resting in the pit formed by your parted heels.
Keep your chin parallel to the floor.
With the arms relaxed, place your palms face-up on your thighs.
This pose is ideal for breathing exercises like bellows breath.
To come out of the pose gently straighten your legs one at a time.

Lie down flat on your back on top of your mat with your legs straight. You can use a folded blanket or a small pillow under your neck or knees if needed to make your entire body completely relaxed and comfortable.
Keep your legs spread comfortably about hip-width apart, and let your feet, knees, and toes relax completely (your feet may rotate slightly outward). Close your eyes.
Place your arms alongside your body with your palms facing upward. Let your hands and fingers relax. Gently tuck your shoulder blades so they are flat on your mat, and let the chest softly open up.
Simply be with your body and breath. Take a couple of deep, slow breaths, becoming aware of your chest and abdomen rising and falling. After a few breaths like this, begin to breathe normally. Relax and feel as though your whole body is melting into the earth beneath you. Completely surrender and let go. Keep your body totally still for a few minutes.
Without much effort, scan the entire body, taking your awareness to different body parts one by one. Slowly release tension from your feet, calves, knees, thighs, pelvis, hips, abdomen, chest, shoulders, left arm and hand, right arm and hand, neck, face, tongue, head, and scalp.
As you scan your body, feel yourself sinking deeper and deeper into relaxation. In the beginning, your mind may wander, but it will slowly settle down into stillness.
Remain still for at least 5 to 10 minutes.
To begin to come out of the corpse pose, keep your eyes closed and gently wiggle your fingers and toes.
Slowly roll onto your right side, and rest in that position for a few moments.
Using the support of your right hand, gently come up into a seated position.
Keep your eyes closed, and take a few deep breaths in and out as you gradually become aware of your environment and body. When you feel complete, slowly and gently open your eyes. This is a great time to practice pranayama and meditation.
Intermediate Poses
When you feel you are ready to try more challenging postures, these asanas are also great for beginning yoga depending on your health, just remember not to strain and keep breathing!
Upward-Facing Dog
Bow Pose
Camel Pose
Eagle Pose
Lotus Pose
Reverse Prayer Pose
Advanced Yoga Poses
When you’re ready to advance on this yogic journey, here are a few asanas to take you to the next level. As always, be mindful of what your body is capable of and BREATHE!
Boat Pose
Fish Pose
Upward Plank Pose
Wheel Pose
Shoulder Stand
For more yoga postures for all levels, browse our library of 50 Yoga Postures for Health, Flexibility, and Inner Strength.
Yoga poses for beginners: Benefits and tips

Benefits
Unlike stretching, the benefits of a yoga practice extend beyond only physical fitness. Yoga practice involves a mind-body connection. When we do yoga asanas, we connect the movement and stretching of the body to the rhythm of the breath and to the state of the mind.
Integrating the mind, body, and breath helps us to direct our attention inward. This in turn helps us to be more aware and in the present moment.
A regular yoga practice offers a whole host of benefits, here’s a list of some of the benefits possible.
- Reduced stress and anxiety
- Weight loss
- Improved immunity
- Increased energy
- Better posture
- Chronic pain relief
- Improved sleep
- Increased flexibility
- Improved heart health
- Better relationships
- Greater awareness
- Mental well-being
- More inner peace
Tips
Talk to your doctor if you have any health concerns.
Find a qualified teacher to help you get started.
Have a yoga buddy.
Practice acceptance and don’t compare yourself to others.
Always practice yoga on an empty stomach.
Start with gentle warm-ups.
Don’t force any pose and always listen to your body.
Keep breathing and coordinate the breath with your movements.
Move into the pose, hold and relax, then release.
Gradually add more postures to your routine.
Add breathing techniques before and after your yoga practice.
Finish with Yoga Nidra or meditation.
How to practice yoga safely as a beginner

Modern yoga has gone digital. There are tons of YouTube videos and yoga apps. But the best way to learn yoga is with a certified yoga teacher in a yoga class, yoga retreat, or yoga studio.
Common mistakes to avoid when practicing yoga
One of the most common mistakes new yoga practitioners make is to strain or overreach while in any given posture. The second mistake made most frequently is forgetting to breathe, which is actually the most important thing to remember! If you keep breathing and overreach, your breath will help you in the stretch and avoid injuries.
Yoga equipment for beginners: What you need
Essential:
Optional (to advance your practice):
Yoga poses for kids: Benefits and tips

Kids are natural yogis! If you ever watch young children for any length of time, they do so many yoga postures naturally– downward-facing dog, bridge pose, cobra, child’s pose, and more!
Even as babies, children place their hands in mudras (yogic hand positions). Adi mudra (thumbs tucked into a gentle fist) aids brain development. Merudanda (gentle fist with thumbs pointing up) is used when toddlers suck their thumbs, which sends energy to the spine for stability and growth.
Any of the above basic poses are suitable for kids.
Benefits
- More confidence
- Reduced stress and negative emotions
- Better concentration
- Improved interpersonal relationships
Tips
Try doing some “animal” yoga with younger children. Playfully call out names of animals they can pose in. These are not likely to look like the animal-named poses you do but are a great introduction to movement related to yoga.
Join your teen in a friendly competition of sun salutations before going to school (you may need to entice them with an incentive to get them started).
Don’t push your children to participate in yoga. Invite them, and let them come on their own.
Enroll your child or teen in a SKY Kids & Teens program featuring yoga postures, breathing, meditation, and skill building (available online).
Supplement your yoga practice with the Art of Living
Yoga postures are just one part of the world of yoga. Breathing and meditation are excellent adjuncts to your daily yoga practice. In fact, they have a copacetic relationship with each other. You already know that you need to breathe while doing yoga, but where to learn all the various breathing techniques and what meditation practice works best? The Art of Living has vast resources including courses with many techniques, an online yoga studio, YouTube videos, articles on every topic imaginable, a meditation app with practical wisdom for living, and so much more!
Our foundational program, SKY Breath Meditation, is the perfect practice for anyone who loves yoga. SKY will supercharge all of your yoga benefits while adding others, like improving respiratory function, increasing optimism, reducing PTSD symptoms and addictive behaviors, and so much more!

Related articles:
A Brief History of Yoga
The Science Behind Yoga
Yoga at Home: 10 Tips for Beginners
Sun Salutation Yoga: 11 Facts about Your Daily Full Body Workout
Yoga with Pilates? It’s fun!
Yoga and Enlightenment: Finding the Unshakeable Self
How to Make the Yamas and Niyamas Work for You in the Modern World


